Draw an Airport Mechanical Text Display From Scratch

When was the last time you went to an airport? While waiting, you might stumble into an interesting schedule display. Each character board is flipped to reveal the next character. That’s what we want to create here, a mechanical text display. We are going to use only Photoshop in this project. Let’s get started!
Step 1: Preparing Canvas
Start by making a new file for our text. Set its size to 1200 px × 800 px.

Step 2
Add new Adjustment Layer Solid Color.

Step 3
Set its color to #26282d. This is going to be background of the text display.

Step 4
We want everything to be organized. One of the simple way to do this is placing elements in its own related set. While the adjustment layer is selected, hit Ctrl + G to place in a group layer. Double click its name to edit it.

Step 5: Start Designing Text Base
Add another group layer with name First Digit.

Step 6
Add a rounded rectangle with color #141213. This is going the base of our text.

Step 7
Double click the layer shape and then apply Bevel & Emboss and Gradient Overlay. For its settings, see screenshots below.


This is the result we have.

Step 8
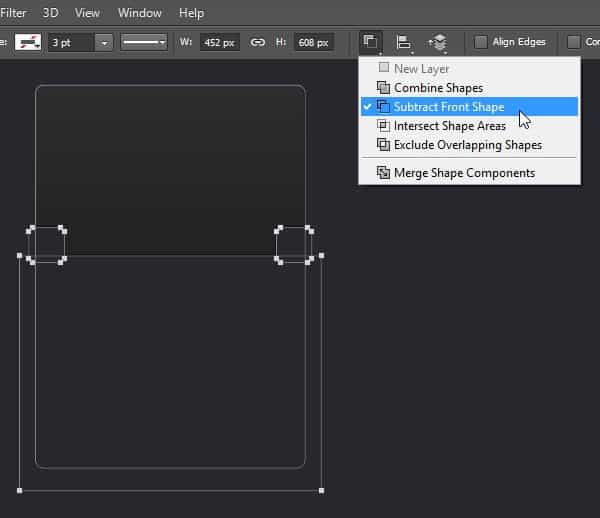
Add two rounded rectangles and a rectangle path into the previous shape. Set its mode to Subtract Front Shape.

Step 9
Ctrl-click the shape layer we have just made to make new selection based on its shape.

Step 10
Make new layer. Click Edit > Stroke. Set Width: 1 px, Color: #, and Location: Inside. Photoshop will make a 1 px line along the selection.

Step 11
Remove selection by hitting Ctrl + D.

Step 12
Hit Ctrl + Alt + G to convert layer into a Clipping Mask. Click Add layer mask icon in bottom of Layers panel to add layer mask. Fill layer mask with black by clicking D and then Ctrl + Delete. Activate Brush tool and then paint white to reveal some of the stroke line and add highlight into the layer shape.

Step 13
We have just made strong highlight. Now, we want to make softer highlight. Make new layer. Ctrl-click the shape. Perform stroke command to add stroke line. Apply Gaussian Blur filter from menu Filter > Blur > Gaussian Blur.

Step 14
Add layer mask and then fill it with black. Paint layer mask with white to reveal softer highlight inside the layer shape. Convert the layer to Clipping Mask (Ctrl + Alt + G).

Step 15
Add new layer and then paint white on top of the layer shape.

Step 16
Select part of the highlight that stay inside the layer shape and then click Add layer mask icon.

Step 17
Add another layer and then convert it to Clipping Mask. Paint black to add shadow inside the layer shape. Do this using regular Brush tool.

Step 18
Reduce its layer Opacity.

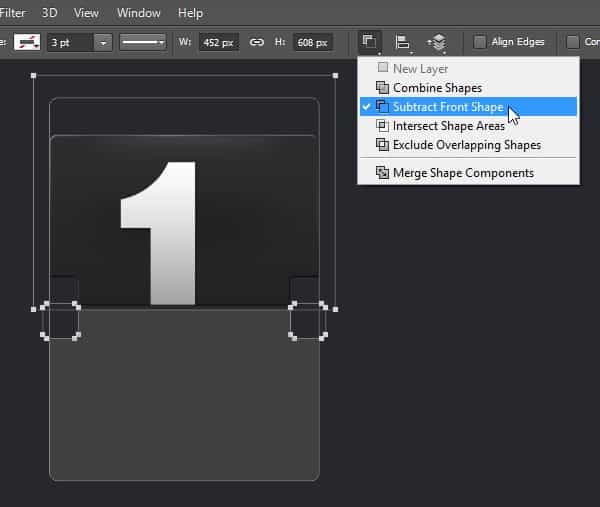
Step 19: Adding Text
Add new text on top of the layer shape.

Step 20
Hit Ctrl + Alt + G to convert it to Clipping Mask.

Step 21
Convert the text to Smart Object. Right click it and select Convert to Smart Object.

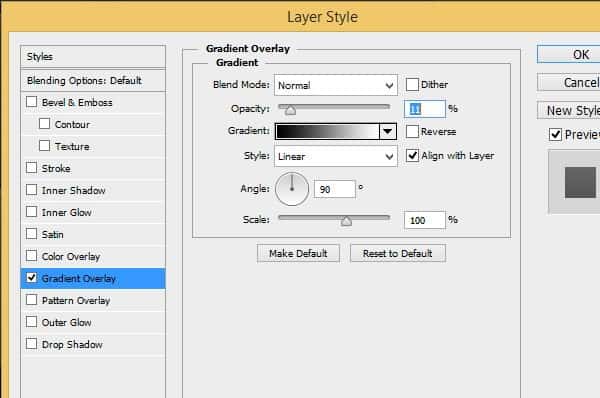
Step 22
Double click the text smart object to add Layer Style Gradient Overlay and Drop Shadow.


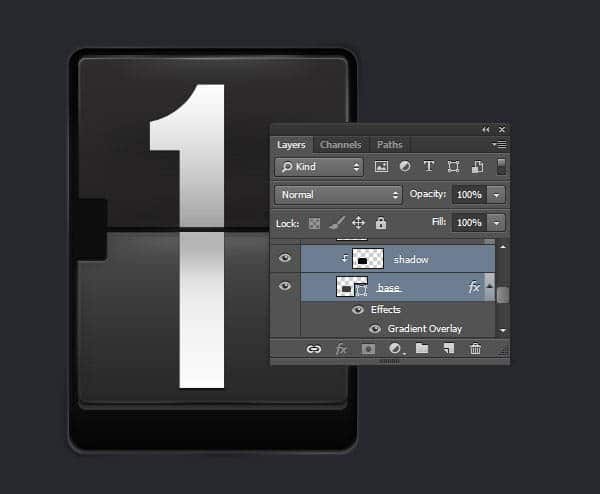
This is the text appearance in upper part of the display.

Step 23
Now, we want to add lower part of the display. All you need to do is just replicate Step 8. But this time, subtract its lower part.
Step 24
Add Bevel & Emboss, Inner Shadow, and Gradient Overlay with following settings.


Step 25
Apply same highlight as the first upper part.

Step 25
Hit Ctrl + J to duplicate the text we have made earlier.

Step 26
Change its layer style to Gradient Overlay and Drop Shadow with following settings.


Step 27
Ctr-click the lower shape to make new selection based on its shape. Add layer mask to the text. From now on, only part of the text that is located on the lowe shape is seen.

Step 28
Add new layer and then paint subtle shadow on upper part of the text using low Opacity Brush tool.

Step 29
Convert the shadow layer into a Clipping Mask.

Step 30: Text Display Base
Draw almost black (#060606) rounded rectangle shape behind the text display. This will be the hole where the character panel is located.

Step 31
Double click the layer to add Bevel & Emboss with following settings.

The result, so far.

Step 32
Ctrl-click the layer shape we have just made to make new selection based on its shape. Make new layer and then fill it with white.

Step 33
Paint some areas with white.

Step 34
Change its layer blend mode to Overlay.

Step 35
Ctrl-Click the layer we have made. Make new layer. Click Edit > Stroke, set it width to 2 px with white for its color.

Step 36
Click Filter > Blur > Gaussian Blur to soften the stroke line.

Step 37
Reduce its layer Opacity to 10%. This white soft line will become highlight on outer edge of the text display.

Step 38
Add another line stroke similar to what we’ve done in Step 35. But this time use black for its color. This will be shadow on outer edge of the hole.

Step 39
We also want to add stronger highlight right on the edge. Ctrl-click the shape to make another new selection based on its shape. Click Edit > Stroke with width 1 px and white color.


Step 40
Add layer mask and fill it with black. Activate soft Brush tool. Set foreground color to white and then paint some areas to reveal the strong highlight on the edge.

Step 41
Duplicate basic layer shape of the lower part of the text display. Activate Move tool and then hit Shift + Down arrow to move it down 10 pixels.

Step 42
Double click the layer shape and add Gradient Overlay.
Step 43
Place the layer shape beneath the main text display area.

Step 44
Ctrl-click the main lower part of the text display. Make new layer above the layer shape we have just created. Fill selection with black.

Step 45
Move the layer down 2 pixels.

Step 46
Apply Gaussian Blur to soften it and make it appears as a natural shadow.

Step 47
Make sure the shadow goes inside the layer shape by converting it to Clipping Mask.

Step 48
Select both shape layer –that we have duplicated earlier– and the shadow that stay on top of it.
Step 49
Hit Ctrl + J to duplicate them both.

Step 50
Place the layer shape and shadow we have duplicated in earlier step behind the original one. At this moment, we should have two text bases behind the text that is currently displayed.

Step 51
Again, duplicate the layer shape and its shadow. Keep repeating these steps until we have enough text base at the back of the displayed text.

Step 52
Ctr-click the last layer shape to make a new layer shape based on its shape. Make new layer and make sure it is placed right behind the displayed text base. Activate Brush tool and set its foreground color to black.

Step 53
Paint lower part of the selection with black until the text base at the bottom of the stack fades into black background. Next, draw two rectangles on middle left and middle right side of the text base.

Step 54
Double click the rectangles layer shape and then add Layer Style Inner Shadow, Inner Glow, and Gradient Overlay using following settings. Make sure you activate Preview option under the New Style button. This way, you can see the result in real time while editing the parameters.


In the Gradient Overlay setting, use following color in the gradient. To edit the gradient, click its preview to open Gradient Editor dialog box. Click below the bar to add color to the gradient.

This is the result we have.

Step 54
Ctrl-click the rectangular shapes we have made earlier. Make new layer and then fill it with gradient from black to white as seen below.

Step 55
Change its blend mode layer to Overlay.

Step 56
Now, we want to add lines into the rectangular shapes. Make new layer and then draw a black line using Pencil tool. To produce a perfect straight line, drag while holding the Shift key

Step 57
Hit Ctrl + A then Shift + Alt + Down. This step will duplicate the line we have just made earlier.

Step 58
Without removing the selection, hit Ctrl + Shift + Alt + Down to keep on duplicating the line repeatedly.

Step 59
Convert the lines layer to Clipping Mask, nested to the rectangle shape layer.

This is the result we have.

Step 60
Ctrl-click the base of the displayed text to make new selection based their shapes. Click Edit > Stroke. Set width to 2 px with color white and location inside. Hit OK button.

Step 61
Soften the stroke by applying Gaussian Blur filter. Set its Radius to 2 px.

Step 62
Add layer mask into the mask and then fill it with black. Paint white using soft brush to reveal some parts of the stroke line.

Notice the subtle differences before and adding highlight on the text base edge.


Step 63
Select the text display group layer. Hit Ctrl + J to duplicate it. Move its position next to the original text.

Step 64
To help us keep track in the editing process, rename the new text display to Second Digit.

Step 65
Currently, both texts are identical. We don’t want this. We don’t each text to be individually unique. To do this, we will add custom highlight on each of the text display. The process is similar to adding highlight that we’ve done earlier. Start by adding new group layer on top, for its name use custom highlight.

Step 66
Ctrl-click the holes shape in both the text display to make new selection based on its shape.

Step 67
Make new layer and then fill it with gradient frm white to black.

Step 68
Change its layer’s blend mode to Overlay. Right now, one of the text is darker than the other.


Step 69
Without removing the previous selection, make new layer and then fill it with black. Click Filter > Noise > Add Noise.

Step 70
Change layer’s blend mode to Overlay.

Step 71
Using earlier selection, apply Stroke command. Set its color to white with width 2 px.

Step 72
Soften it using Gaussian Blur. Add layer mask and then fill it with black. Paint some of the stroke line segment with white to reveal it back.

Step 73
Below, you can see the difference after before and after adding custom highlight.

Step 74: Fixing Text
Currently, both texts come from the same Smart Object. This means that if we edit of the text, the other will automatically updated too. Try this by double clicking one of the text to edit its content.

Step 75
You might find this dialog box, informing you to save to the same location. If you do find it, just click OK.

Step 76
The text will be opened in a separate file. Change the text and then hit Ctrl + S to save it. If the text doesn’t fit the canvas, click Image > Reveal All to resize the canvas automatically.

Step 77
As you can see in the screenshot, the text in both display is updated. Of course, we want each text to be unique.

Step 78
Open up the First Digit group layer. Select its text layer and then duplicate it (Ctrl + J).

Step 79
Place it on top of the layer and click its eye icon to make it invisible. From now on, if we want to edit the text, all we have to do is just double click this text layer without going through inside the group layer.

Step 80
Open up the group layer in Second Digit and search for its text Smart Object. Right click and then select New Smart Object via Copy. Photoshop will create new duplicated Smart Object but not related to the original one. Replace the original text Smart Object with the new one.


Step 81
We are now going to test the new Smart Object. Double clik the text we have just duplicated.

Step 82
The text Smart Object is opened in new file window. Edit its text. Save and close the file.

Step 83
As you can see here, the changes we made in this new Smart Object is independent from the first one.

Step 84
Duplicate the Smart Object we have just made using shortcut Ctrl + J. Replace text on lower part of the display with this newly duplicated text.

Step 85
Duplicate the second text layer and then put it on top of the layer stack. Click its eye icon to make it invisible.

Step 84
Let’s do another test on the text. Double click the first text to edit its content.

Step 85
Change the text.

Step 86
Save and close the file.

Download the PSD
Final Results
![ps-tut-airport-mechanical-text-display-final[1]](https://i2.wp.com/www.photoshoptutorials.ws/wp-content/uploads/2014/11/pstutairportmechanicaltextdisplayfinal1.jpg?resize=600%2C412 "ps-tut-airport-mechanical-text-display-final[1]")


Comentarii
Trimiteți un comentariu